Latest Features in Version 2.3
| • | Registration screen added. |
| • | Multilingual support for English and French versions of Report-IT. |
| • | The ability to store codecs as Favourites and Contacts within Report-IT Live and easily retrieve/edit them. |
| • | Several features added to management of reports including: |
| ▪ | Addition of default playlists. |
| • | Added capability to insert recorded reports via playlists into a live broadcast, or use playlists to transmit recordings to the studio off-line. |
| • | Removal of the Retransmit screen and replacement with the report playback screen, including additional playback features like: |
| ▪ | Report playlist selection. |
| ▪ | Ability to view report playback progress using a playback screen with playback audio level adjustment. |
| • | Addition of a Codec pane on the Report Live home screen to: |
| ▪ | Display details of the codec to which you are currently connected. |
Getting Started
Once purchased and installed, tap the Report-IT  app symbol to run the application on the iPhone.
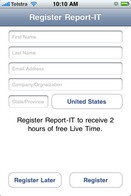
When the application is opened for the first time you are prompted to register Report-IT with Tieline. This is essential with Report-IT Lite and Report-IT Live versions in order to receive free live time hours. It is also important to register Report-IT Live Pro to receive important information about new features as they are implemented. If you choose to register later, tap the Information  symbol from within the 'live' or 'record' mode screens to open the Configuration page, then tap Register and fill in the required information.
After the registration screen is closed the Configuration screen is displayed. This will only occur the first time the app is used.
| 1. | Tap the Codec field in the the Configuration screen. |
| 2. | Tap the Codec field underneath Favourites and Contacts. |
| 3. | Tap Codec Address and use the on-screen keypad to manually enter the IP address of the codec to which you will connect.. |
| 4. | Use the keypad to enter the numeric IP address of the codec to which you are connecting. |
| 5. | Tap the Codec button in the top left-hand corner to save the settings and return to the previous screen. |
| 7. | Optional: Tap the Add to Favourites and Add to Contacts buttons at the bottom of the screen to save the settings for retrieval from Contacts or Favourites. |
| 8. | Tap the Codecs button in the top left-hand corner of the screen to return to the Codecs screen. |
| 9. | Tap the Configuration button at the top of the Codecs screen to return to the Configuration screen. |
| 10. | Tap the Done button in the top left-hand corner to exit Configuration and return to the Home screen, where the connection you have just programmed will be visible in the Codec pane. |


|
FTP and Other Connection Notes:
| • | To connect to a codec with settings saved in Contacts or Favourites previously entered into Report-IT, tap the blue arrow symbol  on the Report Live screen to open the Codecs page. Select from either Favourites or Contacts to choose a codec from those listed and then select the codec URL (see Dialing Favourites or Contacts). on the Report Live screen to open the Codecs page. Select from either Favourites or Contacts to choose a codec from those listed and then select the codec URL (see Dialing Favourites or Contacts). |
| • | If you are performing FTP file transfers to an FTP server then enter the FTP Settings and audio Encoding Settings for recordings that will be transferred (see Programming FTP Settings for more info). |
|
By default:
| • | Auto Reconnection is ON (i.e. the Report-IT program will attempt to automatically reconn ect to the studio codec if the connection is temporarily lost). Note: Tap the Information symbol to open the Configuration page, then tap Advanced > Auto Reconnection to adjust this setting. |
| • | The Initial Audio Bitrate of the connection is programmed for 24Kbps. Note: Tap the Information symbol to open the Configuration page and tap Initial Audio Bitrate to adjust the bit-rate setting prior to connecting. This setting is retained for all connections until it is changed. |
| • | The Return PPM meter on the Home screen displays no audio until a connection to the studio codec is created. |
| • | Recording of a report when connecting live is not enabled by default. See Recording a Report for more details on recording reports. |
Establishing a Connection
| 1. | Use your finger to move the Input Slider to adjust input audio levels. |
| 2. | Tap the Connect button on the Home screen to establish the connection to the studio codec. |
| 3. | Use your finger to adjust the Return Slider to adjust return audio levels from the studio codec. |
Adjusting Input/Output Audio Monitoring
Input audio monitoring via the iPhone headphone output or speakers is switched off by default prior to a connection being made. After a connection is made return audio can be monitored via either the iPhone earphone output or the receiver.
If earphones are being used you can listen to input audio prior to connecting by tapping the Information symbol to open the Configuration page and then swipe the Monitor Input switch to ON. After making a connection return audio will be monitored if Return Channel ON in the Configuration screen remains selected (this setting is on by default).
|
Important Note: If input audio is being monitored and earphones are not being used, audio may be affected by echo caused by input audio being emitted from the iPhone receiver.
|
Disconnecting a Connection
| 1. | Tap the Disconnect button on the Home screen to end the connection. |

|
WARNINGS - To ensure your live or recorded operations are not interrupted by incoming phone calls and other applications:
| 1. | Program call forwarding to voice-mail or another number; tap Settings > Phone > Call Forwarding and then slide the switch to On. |
| 2. | Turn off the RINGER on the left-hand side of the iPhone to avoid SMS tone interruptions. IMPORTANT NOTE: This will not prevent incoming SMS messages and will only stop alert tones. If Report-IT is being used and an SMS is received, a dialog box with Close and Reply buttons is displayed. ONLY press Close in response to an SMS. If you press Reply Report-IT will shut down and suspend your recording or transmission. |
| 3. | If you are recording a report only you can switch on Airplane mode via the iPhone Settings application. In Airplane mode no phone calls or SMS messages will be sent to the iPhone. When you have finished recording, Airplane mode must be turned off to retransmit or FTP your recording. |
| 4. | In the Calendar application, ensure that there are no event alarms enabled during the planned live/recording period. |
| 5. | Ensure that no Clock application alarms are enabled during the planned recording period. |
| 6. | Do not plug in or unplug a headset during recording. Likewise, do not dock or undock the device during recording. |
| 7. | Do not plug the iPhone into a power source during the recording. When an iPhone gets plugged into power, it beeps or vibrates, according to user settings. |
| 8. | DO NOT press the iPhone HOME button when reporting live or recording, or you will exit the Report-IT Live application. |
If you can't enable call forwarding before your report and you receive an incoming call, decline the call ASAP using the Decline button on the iPhone screen. From the time that the incoming call alert is shown, to the time the decline button is pressed, recording will cease and silence will be transmitted.
|
¹ iPhone is a trademark of Apple Inc., registered in the U.S. and other countries.


